
Javascript
JavaScript is a versatile programming language for the Web. One of the best ways to learn JavaScript is to look at other people's code. Below are a couple JavaScript resource websites.
Popup Window
JavaScript allows you to easily access the DOM, which controls the functionality of the browser.
BASIC POPUP WINDOW
This example demonstrates how to create basic JavaScript pop-up windows. We will create two versions of an image: a small, thumbnail version and a large, full-sized version. When a viewer clicks on the thumbnail, a new window containing the full-sized image will pop open. The new window will be sized to fit the full-sized image.
;)
(Click on the thumbnail)
JavaScript can be placed
- In the top section of the page ("head") between the <head> and </head> tags
- In the middle section of the page ("body") between the <body> and </body> tags; or
- In a separate file <script type="text/javascript" src="/javascript/scriptfile.js"></script>
For this script, I will place the JavaScript in the <head> of the document.
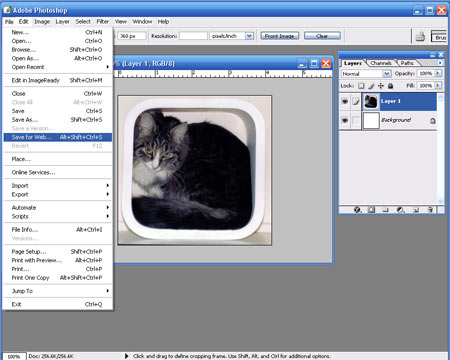
Step 1: Open your image in Photoshop. Save the large version of the image. Make sure you "save for web."
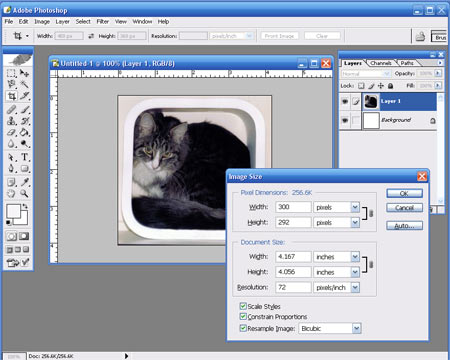
Step 2: Create the small, thumbnail version of the image, by resizing it in Photoshop. Go to Image > Image Size. Make sure that "Constrain Proportions" is checked, so that the width and height remain the same proportions (otherwise the image will be distorted). Then, simply type in a new Pixel Dimension width. I usually use between 75–150 pixels for my thumbnail widths.
Step 3: Once you have resized your image, you can save the thumbnail. Make sure you "save for web."

Step 4: Open a new DreamWeaver HTML file.
Step 5: As always, make sure you save the document first.
Step 6: Then, open the CODE view.
Step 7: Enter the following JavaScript code somewhere between the <head> and </head> tags:
<script language="javascript">
<!--
function pop(link, width, height)
{
var photoWindow = window.open(link, "photo", 'toolbar=0, location=0, directories=0, status=0, menubar=0, scrollbars=1, resizable=0, width='+width+', height='+height);
}
//-->
</script>
This bit of JavaScript is a function, which I have named "pop." When "pop" is called (in the HTML document), it must be sent three arguments: "link", "width" and "height." Link is the address of the file that will be displayed in the pop-up window. Width is the width of the new window, and height is the height of that tnew window. In the JavaScript, I have set toolbar=0, which means that the new window's toolbar will not display. If, instead, I set toolbar=1, then the toolbar would be shown.
Step 8: Next, I like to add one more line of JavaScript to my pop-up window code. Place the following line after the line that begins with var photoWindow = window.open, but before the closing curly brace }.
if (window.focus) {photoWindow.focus()}
The window.focus command tells the browser to bring this new window to the front. In other words, it places the focus of the browser on a certain window. Window.focus is a useful command, but it is not supported by some older browsers; fortunately, these old browser simply ignore the line (rather than giving errors).

Step 9: Yeah! Our JavaScript function is finished. Now, we just need to call it in the HTML body. Go back to the DESIGN view in DreamWeaver. Insert your thumbnail image.
Step 10: Click on the image. In the "Link" box, enter the following:
javascript:pop('YOUR IMAGE NAME', YOUR WIDTH, YOUR HEIGHT)
For me, I entered: javascript:pop('images/cat_example_big.jpg', 545, 535), since I called my large image "cat_example_big.jpg" and I placed it in the "images" directory. My large image is 508 pixels wide, so I entered "545" for the window's width. The width of the window has to be about 40 pixels larger than the size of the image. This extra width is filled by padding, scrollbars, etc. My large image is 500 pixels high, so I entered "535" for the window's height. Again, the extra pixels are filled with padding.
TEST IT: That's all there is to it! Now, you should be able to save your HTML file and view it in your favorite browser.

©101 Design